Aunt Vivian’s Chicken in White Wine Sauce
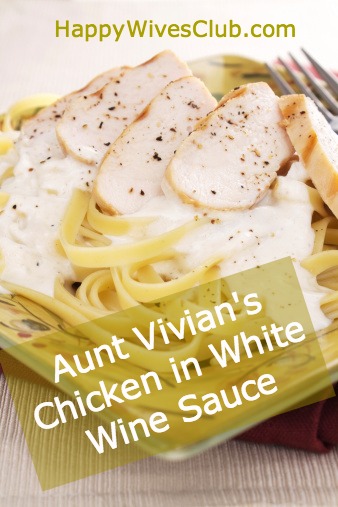
I have never much cared for Italian cuisine. I could leave pasta, the red sauce, and the rich meat sauce alone. Oh but this was until I met an Italian who cooks authentic Italian food. Sharon, our associate pastor and dear friend, introduced me to authentic Italian cuisine about five years ago now. I have tried the best fresh ingredients and flavors. With Sharon’s permission I am sharing this gem of a recipe!
Something I’ve noticed about Italians and the way they cook: It must be made in love! ![]()
From listening to her stories about her family and seeing her love pour out onto us I know that these dishes are more than just making a meal. It is about showing people you love them and wanting to sit down and fellowship with them.
This recipe has been my favorite thus far (and trust me, I have had some amazing dishes).
The Italian name for this dish is: Pollo zia Vivian in salsa di vino bianco which translates to…
Aunt Vivian’s Chicken in White Wine Sauce
- 4-6 Boneless Chicken Breasts
- 1 cup olive oil (approximately)
- 2 cups flour
- 1 stick butter
- 3 cloves garlic
- 1 tsp parsley
- 1/2 lemon
- 5 oz white wine (vino bianco)
- 6 chicken bouillon cubes
With a meat mallet pound the chicken breasts into flour (I put them in a ziploc bag).
Pour approximately 1/2″ of extra virgin olive oil in a large skillet. When the oil is very hot, add the chicken. Cook chicken until it turns white. Remove chicken to a separate plate.
Lower the heat and add the parsley and garlic into the pan. When the garlic turns transparent. Add the butter, wine, and the juice of the lemon letting it simmer on low.
In a mason jar (or container with a lid) add about 10-12 oz hot water & bouillon cubes, taking care to not burn your hand on the hot jar. Shake vigorously, then add 2 Tbs flour & cold water. Shake well. Add this mixture to the skillet. Pour over the chicken. Bake 20-30 minutes at 350 degrees. It should be bubbly and yummy!
This can served over mashed potatoes (that is my vote) or over pasta!
Hope you enjoy!


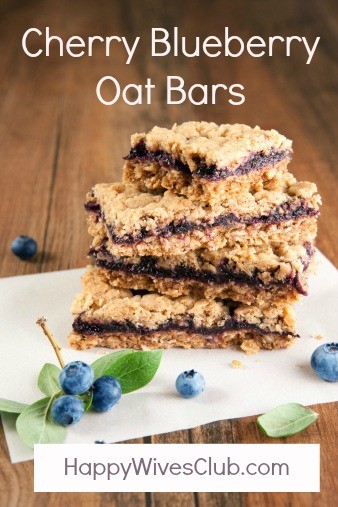
Cherry Blueberry Oat Bars
Last weekend I made it to the farm, barely, to the last day of cherry picking of the season. The large farm was almost picked clean.
Thankfully I am nearly 6 feet tall and could reach the higher branches of the cherry trees, and my 6’1″ hubby was there to help. Two of the four varieties were left, but I didn’t care because every cherry was plump and delicious.
When I got home with the 5 pounds of organic fresh picked cherries the big question became, now what? I scoured through the pages of Pinterest and found a ton of yummy ideas.
With a little tweaking of a cherry bar, I came up with this yummy cherry blueberry oat bar recipe using fresh fruit.
Cherry Blueberry Oat Bar
Ingredients
- 3 cups pitted fresh cherries
- 1 cup fresh blueberries
- package of lemon or yellow cake mix
- 2 1/2 cups quick oats
- 1 cup butter melted
- 1 cup sugar
- 1/4 cup cornstarch
- (optional use 1 can of cherry pie filling instead of fresh fruit)
Instructions
Filling
- Place pitted cherries and blueberries in a medium saucepan on medium heat covered until they release their juice. Then turn down to a simmer for about 10 minutes. Stir often.
- Mix together the cornstarch and sugar in a small bowl. Stir into cherry mixture. Bring to a simmer and cook until sauce is thickened (about 2-3 minutes). Let cool until just warm.
Oat Bars
- Preheat oven to 375 degrees. Spray a 9×13″ baking dish.
- Combine oats and cake mix in a large bowl. Add melted butter and stir until crumbly.
- Take half of the mixture and press down in the bottom of the baking dish. (This is the bottom layer of your bar.)
- Spread the homemade blueberry cherry pie filling (or 1 can of cherry pie filling) carefully over the oat mixture. Take care to make a nice flat surface covering all of the oats.
- Pour the rest of the oat mixture on top and gently spread evenly over the pie filling. Gently press down as if you are sealing it.
- Bake for 18-20 minutes, or until the top is a light golden brown.
- Let cool or enjoy warm. Cut into bars. Enjoy!
This is my new favorite treat! It makes about 18-24 bars depending on how large you cut them. We served them warm with small scoop of vanilla ice cream.
Comment Below: What’s your favorite cherry treat?
Creamy Garlic Salad Dressing
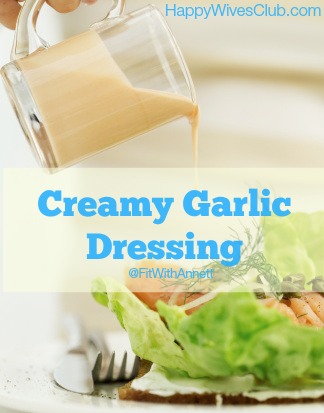
Most commercial dressings are full of unwanted sugar, salt, artificial colors, flavors, and other things your body doesn’t need.
This dressing is void of all of the yuck, and brings on the yum.
If you are looking to clean up your eating, and go as close to nature as possible, this simple recipe is for you.
Creamy Garlic Dressing
Ingredients
- 1/2 cup extra virgin olive oil
- 1/4 cup apple cider vinegar
- 3-4 cloves of garlic
- 3 TBS fresh lemon juice
- 1 tsp sea salt
- 1/2 tsp Dijon mustard
- 1 TBS raw honey (or pure maple syrup)
- 1/2 bunch parsley
Directions
Place all of the ingredients in a blender. Blend until smooth. If you need more parsley or garlic, add more to taste and blend again until smooth. Refrigerate dressing if not using immediately. It’s alright if the dressing solidifies when cold, it’s natural. Just take it out of the refrigerator and keep at room temperature for 30 minutes. Stir before serving. Enjoy!
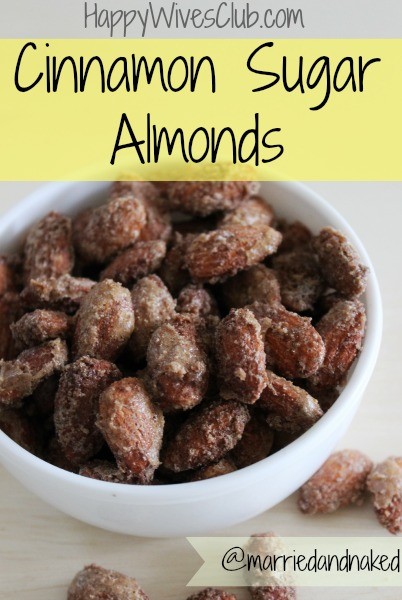
Cinnamon Sugar Almonds
I once heard someone say, “The way to a man’s heart is thru his stomach.” I believe that there is some truth to that statement.
Food is love.
Unfortunately for my husband, I am not a cook. I grew up on microwave dinners and restaurants. The knowledge and gift of being able to whip up a culinary masterpiece from scratch was not passed along to me.
But that doesn’t stop me from trying.
If food is love, then I want to cook for my husband as much as possible.
These Cinnamon Sugar Almonds are a sure ticket to my husband’s heart. They are the perfect combination of nutty crunchy sweetness.
Cinnamon Sugar Almonds
Ingredients
- 1 egg white
- 1 Tbsp water
- 3 Cups Almonds (raw)
- ¼ Cup brown sugar
- ½ Cup granulated sugar
- 3 tsp. Cinnamon
Directions:
Preheat the oven to 300 degrees. Line a baking sheet with parchment paper.
In a small bowl combine the egg white and water. Whisk until it gets a little bit frothy.
In a separate small bowl mix together the sugars and the cinnamon. Set aside.
In a large bowl combine the almonds and the egg white mixture. Stir until almonds are well covered in the egg white. Next, pour in your sugar mixture and combine well to ensure that all almonds are coated.
Spread almonds in an even layer on the baking sheet. Bake for 15 minutes. Remove from oven and give them a stir. Then, bake another 10 – 15 minutes.
I love to eat the almonds when they are still warm from the oven.
Feel free to experiment with combinations of other nuts that you love. Almonds just happen to be my favorite.
You won’t believe how wonderful your house will smell while these are baking.
These almonds are not only a great treat for your husband, but they would also make wonderful gifts for teachers, neighbors, or coworkers.
I hope you enjoy!
What snack do you like to make for your sweetie?
Recipe adapted from Damn Delicious
Easy Chicken Stir Fry
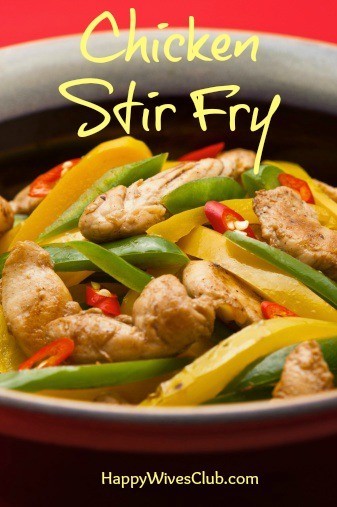
My dad went to culinary arts school. So growing up I had a chance to taste all sorts of creations!
When I got married and started cooking for my husband (at the time I could NOT cook) and we had some adventures. I tried simple recipes. After awhile I started making and mixing my own stuff. This has been a slow process simply because I am a busy woman! I have things to do besides slave over a complicated recipe… oh did I mention I am not that patient? ![]()
So a couple weeks ago I made a dish.. from scratch! It was SO easy! I had to share with all you other busy women out there! (Also this was my VERY FIRST time cooking with ginger! I loved it)
Easy Chicken Stir Fry
Ingredients:
- 2 boneless chicken breast
- 1 bag of minute rice / instant / boil in a bag
- 2 green peppers or red peppers
- 1 large onion, diced
- Vegetable or Olive oil
- Salt
- ginger powder
- garlic powder
- soy sauce
Chicken
Preheat oven to 425. Cut chicken breast into strips. Season chicken with salt, ginger powder, and garlic powder. Sprinkle evenly across the chicken. I did not measure this. Just eyeballed it ![]() Cook the chicken until done. Then cut into bite sized chunks.
Cook the chicken until done. Then cut into bite sized chunks.
Vegetables
Cut the peppers and onion into strips. Then heat up a skillet or frying pan to medium heat with a little oil. I didn’t measure the oil, but my guess is that it was about 3-4 tablespoons. Add 1-2 tablespoons of ginger and 1 tablespoon garlic powder. Saute with the onions and peppers (when the onions are clear they are done).
OK, now I had some instant rice because that is the extent of my talent with rice ![]() I followed directions on box.
I followed directions on box.
Add the chicken to the veggie pan. Add 2 tablespoons of soy sauce. Thoroughly mix into the rice.
Viola! You have a healthy, yummy dinner!!
Disclaimer: I made this portion for just the two of us, so you may want to add more if your cook for a larger family. Also add or take away spices for your families taste buds. Feel free to add more veggies if you want (carrots, snow peas, red onions, water chestnuts, or broccoli). I used what I had on hand. If you have fresh garlic and ginger, use it. It will make it even better!!!
Love,
Aunt LaLa
Sour Cream Coffee Cake
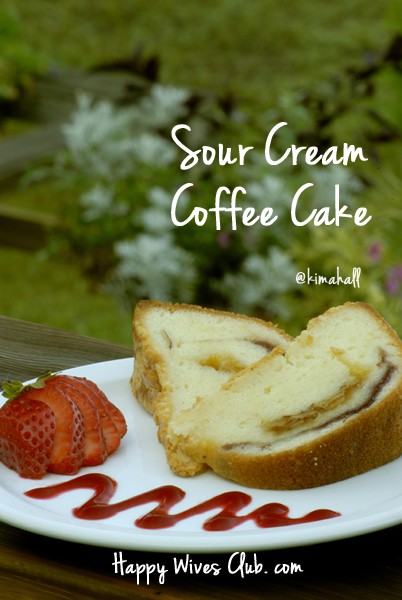
In a previous life, I was an innkeeper.
My parents, my husband and I ran a family-friendly B&B that routinely hosted 30+ individuals per weekend.
We were regularly trying new recipes for flavor and their ability to be made ahead.
When we found dishes that had a terrific home-style taste and that could be prepared at least a day or more before, we’d put them into the breakfast rotation.
Not surprisingly, this soft and moist-crumbed cake was a regular and popular feature on the buffet.
Even though I have had this recipe for over twenty-five years and feel like I’ve made thousands of them, it still is the one I turn to when I have company, or when I want to bring something to a friend, neighbor, or event.
The recipe makes one bundt cake, but I always double it so I can have one to serve immediately and one to put in the freezer for later.
Sour Cream Coffee Cake
Yields 1 bundt coffee cake.
Recipe can be doubled to make two. (I highly recommend doing this!)
Ingredients:
- 2 c. flour (10 oz)
- 1 tsp baking powder
- 1 tsp baking soda
- 1/4 tsp salt
- 1/4 lb. butter (1 stick), room temperature
- 1 c. sugar (7 oz)
- 1 tsp vanilla extract
- 2 large eggs
- 1 c. light or regular sour cream (If doubling, you can use a 16 oz container)
Topping
- 1/4 c. sugar
- 1 tsp cinnamon
- 1/2 c. walnuts (optional)
Directions:
Measure flour, baking powder, baking soda, and salt into bowl. Whisk to combine; set aside.
Mix sugar and cinnamon for topping; set aside.
Beat butter, sugar, vanilla, and eggs with electric mixer until well mixed. Add flour mixture and sour cream to butter/sugar mix. Beat slowly until blended. Stop beaters, and gently stir batter up from bottom of bowl to be sure all the dry ingredients are blended in equally. Batter will be quite thick.
Spread half of batter in well-greased bundt pan. If in doubt, go heavier on the bottom half. Sprinkle half of sugar cinnamon topping on top of batter, then sprinkle half of nuts over sugar. Drop spoonfuls of remaining batter into bundt pan, spread out evenly. Top with remaining sugar cinnamon topping and nuts. Press nuts lightly into top of batter.
Bake at 350 degrees for 30-40 minutes, until a cake tester comes out clean. Cool for about 30 minutes, until pans are cool enough to handle. Run a plastic knife around edges of bundt pan, flip onto plate and then back over onto cooling rack.
Let sit until completely cool. Cut and serve, or wrap whole and put in the freezer.
I cut the cakes into 20 pieces, which gives a nice size slice without being overwhelmingly large.
This cake keeps exceedingly well in the freezer.
May you find happiness wherever you are!
~Kim, your personal Sherpa of Joy at Too Darn Happy
Tropical Green Smoothie

Today in Southern California, where I live, the temperature is 92 degrees! I’m a little north of Los Angeles, and we are having a mini heatwave.
On days like this I try not to turn on the stove or oven. I like to eat cool salads dressed with homemade citrus dressing. Or, I like to enjoy cool and sweet fruit and green smoothies.
Most of my friends are used to the smoothies from popular juice chains that are filled with nothing but fruit and yogurt. But, if you have a a blender you can throw in some greens and make an even healthier treat (without the dairy).
I joined a 30 day green smoothie challenge a couple weeks ago. To be honest, I was a little scared of how these green smoothies would turn out because I really didn’t want to chew my juice. Having a juicer that extracts all of the excess fiber means that my juice comes out smooth just like it would if you were buying it in a bottle from the store. To my surprise, the first juice I blended in my Blendtec blender was great!
Being the type of gal who loves to share what she learns, here’s one of my favorite recipes from the challenge with my own tangy twist.
Tropical Green Smoothie
Ingredients:
- 2 cups cold water
- 2 cups spinach
- 1 cup ripe fresh pineapple
- 1 orange (peeled)
- 1 ripe banana
- 1/4 cup unsweetened coconut flakes
- 1/4 lime (peeled)
Directions:
Pour water, coconut flakes, and spinach into blender. Blend until smooth (no chunks). Next add pineapple, orange, banana, and lime. Blend until smooth. If you wish you can add 1 cup of ice and blend to a smoothie texture, or serve over ice.
Enjoy!
Comment: What’s your favorite Green Smoothie Recipe?
Quinoa Risotto
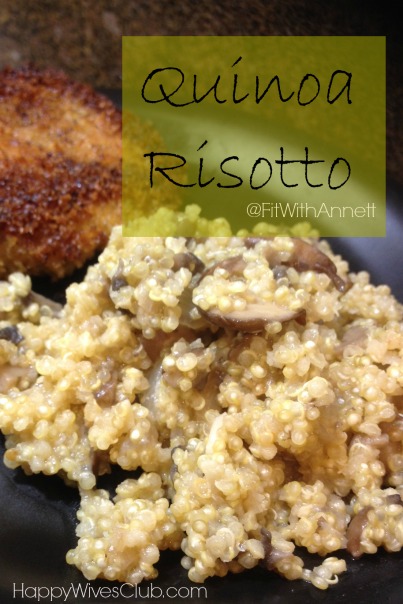
A few years ago, I played in a volleyball tournament in South Carolina.
It was hot, muggy, and gorgeous. We made a good showing at the event making it to the semi-finals I believe. I’m not good at remembering my finishes.
What stood out to me more than anything, and is something that I have never forgotten was my first taste of quinoa.
At this particular event the staff of the AVP (the professional volleyball tour that I played for) had hired a fantastic chef to prepare our food. Everything was delicious, and highly nutritious.
It wasn’t until last year though that I actually tried to make quinoa and it has become one of my favorite side (or main) dishes.
If you’ve never tried it, I highly recommend that you do. It can be substituted for rice, and what I love is that it packs a lot of protein.
Quinoa Risotto
Ingredients
- 4 Tbsp olive oil
- 8 oz baby bella mushrooms
- 1 cup quinoa, rinsed
- 3 cups chicken broth (or veggie broth)
- 1/3 cup white wine
- 1 shallot diced
- 2 cloves garlic, minced
- 1/4 cup parmesan cheese, grated
- salt and pepper to taste
Directions
In a large skillet heat the olive oil over medium heat. Add the mushrooms and saute until soft (about 5 minutes). Remove from skillet and set aside. Add garlic and shalot to pan and saute until they being to soften and turn translucent, about 5 minutes.
Add quinoa. Stir for approximately 3 minutes. Lower the heat to simmer, and add the wine cooking until it is absorbed. Next add 1 1/2 cups broth. Stir until it is absorbed completely. After that add the remainder of the broth. Stir occasionally until broth is absorbed and qunioa germs burst open. It should taste al dente when done.
Stir in the parmesan cheese and mushrooms, and turn off heat. Cover with a lid and let stand 5 minutes.
What’s your favorite risotto?
Healthy 3-Ingredient Ice Cream

Being a virtual health and fitness coach I usually don’t recommend eating ice cream to my clients. But, it’s one of those things that usually are at the top of their list of indulgences.
So what’s a coach to do?
Give them what they want!
I believe in not giving up the things we love, but instead figuring out healthier ways to enjoy them.
When I have a client who just “can’t live without ice cream”, this is the recipe I give them.
Oh and if you can’t have diary you’re in luck! It’s dairy free. ![]()
3-Ingredient Ice Cream
Ingredients
- Ripe Banana
- 1 tsp vanilla extract
- 3 cups ice
In a very good blender (like a Blentec or Vitamix) put all of the ingredients inside. Blend on the ice cream setting or blend until you have the texture of ice cream.
(If you’d like to level out your blood sugar level you can sprinkle a few sliced almonds on top). Sometimes I add strawberries or blueberries to it as well. Enjoy!
For more easy recipes and fitness tips you can visit me at Fit Moms Fit Kids Club.
Grandma Pruitt’s Tender Chicken
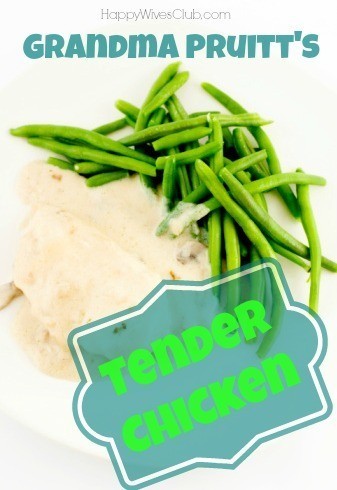
I have such fond memories of my maternal great grandmother. Grandma Pruitt came to our house frequently.
There was a recipe my dad created that Grandma Pruitt loved!
She would always eat several pieces.
Dad made it for her every time she came over. So I am going to share it with you.
It is one of my favorite things! (and sooo simple!!)
Grandma Pruitt’s Tender Chicken
Ingredients:
- 4 Chicken Breast
- Jar of Miracle Whip (or salad dressing)
- Bottle of Italian salad dressing
- Lemon pepper
- garlic powder
You will need to marinate chicken first. Lightly dust chicken with the lemon pepper and garlic powder. In a bowl that you can cover put the chicken in there and pour a little less than half of the Italian salad dressing. Cover and place in the refrigerator. Let sit for a few hours – or longer if you decide. I usually leave it soaking while I’m at work.
Sauce: (Amounts can be altered depending your own taste)
- Add 1/2 cup of Miracle Whip
- Add the remainder of the Italian dressing
- Mix it and it’s ready. As far as consistency it needs to be thin enough to go over chicken and have some in the bottom of the pan. Just needs to be placed in a medium/smaller size pan. A little deep for sauce.
- Preheat oven to 450 degrees
- Pour sauce over chicken
- Bake until done (40-45 minutes) – I like mine crispy

That is it! See how simple? It is so good! I usually pair it up with a good salad and maybe some rolls or biscuits.
Let me know how you like it.
What’s your favorite chicken recipe?
Come visit me over at Aunt LaLa !
Easy Banana Pancakes – Just 2 ingredients

Who says that pancakes can’t be part of a healthy diet?
Who says that making pancakes from scratch is hard?
Who says that once you go gluten free that you can’t have pancakes ever again?
With this easy 2 ingredient recipe, yes you can!
This recipe is gluten free, AND dairy free so if you are sensitive to either you can enjoy these too.
Ingredients
2 1/2 ripe bananas
4 eggs
(optional cinnamon, pumpkin pie spice, pure vanilla extract)
Directions
Put 4 eggs into blender. Add bananas. Pulse until blended. (You can also just put it all in a bowl and smash/stir together). If you wish you can add other seasonings listed above.
Heat griddle until hot. Use cooking spray, coconut oil or grass fed butter to oil pan if you aren’t using a non-stick griddle. Pour pancake batter onto pan. Cook about 1 1/2 – 2 minutes until pancake when lifted slightly is medium brown underneath. Once it’s medium brown in color flip to the other side. Cook until done.
You can serve with blueberries, strawberries, bananas, and top with pure maple syrup. Or, you can eat it with no toppings at all. It’s yummy as is.
Enjoy!
Oh Fudge – it’s super easy!

Who doesn’t like the rich, creamy, chocolatey taste of homemade fudge?
It’s a great gift to give away to friends and family members for any occasion.
We like to give hostess gifts when we are invited to parties, this is a quick and easy gift to make. Another great time to give away fudge is when you have someone new that moves into your neighborhood.
This recipe has only 5 ingredients! It takes no time to prep. Someone may just have to hold you back while it chills in the fridge (so you won’t eat it)!
Super Simple Fudge
Ingredients:
3 cups of semisweet or milk chocolate chips
1 (14oz) can of sweetened condensed milk
dash of salt
1 teaspoon real vanilla extract
1 cup chopped walnuts (optional)
Directions:
1. In a heavy saucepan over low heat add the first 3 ingredients. Gently stir until the chocolate is melted and the ingredients are well combined. Next, add the nuts (optional) and vanilla, stirring until combined.
2. Pour onto a well greased 8×8″ glass dish (or line it with wax paper). Refrigerate until set or firm (about 2 hours).
ENJOY!
Aunt Vivian’s Chicken in White Wine Sauce
I have never much cared for Italian cuisine. I could leave pasta, the red sauce, and the rich meat sauce alone. Oh but this was until I met an Italian who cooks authentic Italian food. Sharon, our associate pastor and dear friend, introduced me to authentic Italian cuisine about five years ago now. I have tried the best fresh ingredients and flavors. With Sharon’s permission I am sharing this gem of a recipe!
Something I’ve noticed about Italians and the way they cook: It must be made in love! ![]()
From listening to her stories about her family and seeing her love pour out onto us I know that these dishes are more than just making a meal. It is about showing people you love them and wanting to sit down and fellowship with them.
This recipe has been my favorite thus far (and trust me, I have had some amazing dishes).
The Italian name for this dish is: Pollo zia Vivian in salsa di vino bianco which translates to…
Aunt Vivian’s Chicken in White Wine Sauce
- 4-6 Boneless Chicken Breasts
- 1 cup olive oil (approximately)
- 2 cups flour
- 1 stick butter
- 3 cloves garlic
- 1 tsp parsley
- 1/2 lemon
- 5 oz white wine (vino bianco)
- 6 chicken bouillon cubes
With a meat mallet pound the chicken breasts into flour (I put them in a ziploc bag).
Pour approximately 1/2″ of extra virgin olive oil in a large skillet. When the oil is very hot, add the chicken. Cook chicken until it turns white. Remove chicken to a separate plate.
Lower the heat and add the parsley and garlic into the pan. When the garlic turns transparent. Add the butter, wine, and the juice of the lemon letting it simmer on low.
In a mason jar (or container with a lid) add about 10-12 oz hot water & bouillon cubes, taking care to not burn your hand on the hot jar. Shake vigorously, then add 2 Tbs flour & cold water. Shake well. Add this mixture to the skillet. Pour over the chicken. Bake 20-30 minutes at 350 degrees. It should be bubbly and yummy!
This can served over mashed potatoes (that is my vote) or over pasta!
Hope you enjoy!
GET MORE RECEPIES
Aunt Vivian’s Chicken in White Wine Sauce
I have never much cared for Italian cuisine. I could leave pasta, the red sauce, and the rich meat sauce alone. Oh but this was until …
Cherry Blueberry Oat Bars
Last weekend I made it to the farm, barely, to the last day of cherry picking of the season. The large farm was almost picked clean. …
Creamy Garlic Salad Dressing
Most commercial dressings are full of unwanted sugar, salt, artificial colors, flavors, and other things your body doesn’t need. This dressing is void of all of …
Cinnamon Sugar Almonds
I once heard someone say, “The way to a man’s heart is thru his stomach.” I believe that there is some truth to that statement. Food …
Easy Chicken Stir Fry
My dad went to culinary arts school. So growing up I had a chance to taste all sorts of creations! When I got married and started …
Sour Cream Coffee Cake
In a previous life, I was an innkeeper. My parents, my husband and I ran a family-friendly B&B that routinely hosted 30+ individuals per weekend. We …